Made by a Fabricista: Red Hot Summer Halter Dress


It has happened to all of us a least once right? You see a pattern and you KNOW you have to make it, like ASAP! Well that is the feeling I had about this new Summer pattern from Vogue.

 |
| from fabricmartfabrics.com |
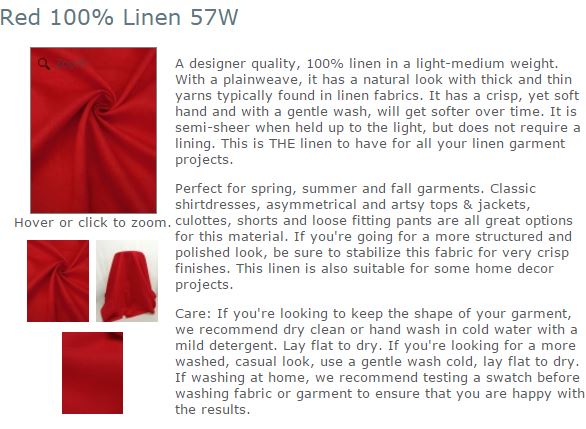
The pattern calls for medium weight twill, poplin or linen, so I immediately thought to use Fabric Mart's amazing designer linen. I have used this linen before (see here) and I knew it would be the perfect texture and weight. For that reason selecting the fabric was the easy part, the tricky part was deciding on a color! I mean, come on, there are 23 colors to choose from! At first I was going to go with bright orange just like the envelope model is wearing (we're about the same complexion so I thought why not?), then cycled through the avocado (because I've wanted to use it for a while), purple (because it is one of my favorite colors) and sunflower (because it looked so summery!) Obviously I decided on this bright red because it is one of my favorite colors and my husband loves it on me.

On to the sewing...at first glance the pattern looked a tad advanced and I was surprised Vogue categorizes it as average. However after constructing the dress I realized Vogue was right, there was nothing in the construction of this dress that I had not done before. I read over the instructions more closely than usual and followed them for particular steps however as typical for me, I constructed the dress all out of order.

I wasn't sure what size to cut as my actual measurement are 38", 35", 42" give or take and I fell between a 16 and a 18. I decided to start with the lining to test the fitting. I often do this as to not waste my main fabric if I'm wrong and if all goes well my lining is done! I graded from a size 16 at the shoulder and bust to a size 18 at the waist and hip. When I test fit the front bodice and skirt I decided the 18 was about 1/2" too large and decided to cut the 16. At that point I took in the skirt and discarded the front bodice (as it is to be self lined).
 |
| 1. Attach one side of zipper to right side of back band 2. Grab the back band lining 3. Place lining piece over outer piece lining up edges and pin 4. Sew around the back band leaving side open for turning |
The bodice is simple and I think you could use lining fabric if you prefer as long as it is close in color and you press your garment well and understitch to ensure the lining doesn't peek out. The back band was simple as well though I veered away from the pattern instructions to eliminate any hand sewing. After attaching the zipper to the right side of the band band the instructions have you fold over and press the seam allowances on the zipper side of both the band and band lining before sewing the top and bottom edges finishing with hand sewing the inner band at the zipper. Instead I simply placed the band lining RSF over the band main fabric, sewed along the perimeter being careful to to hit the zipper teeth and leaving the band side open for turning. That way you can eliminate the hand sewing.
 |
| Where I re-positioned the back band on the side bodice. |
Thankfully I remembered to do another test fit of the bodice before joining the self lining. I had way too much give in the back band. I suppose I should have cut a size 14 bodice instead of a 16. The fix was easy, I simply ripped out the stitches and moved the band over as well as changed the angle pinned and tried it back on. Thankfully my first attempt was pretty much dead on.

EDIT: ...or so I thought, I didn't notice how tight the back band was until I took these pictures. Sigh the disadvantage of looking over your shoulder at a mirror and going by feel. The tightness made me feel supported in the front but it unfortunately caused my back fat to spill out. Next time I will cut a 16 bodice front but a 14 back band and keep the 16 skirt. Carry on....

Next up was the skirt which I was dreading simply because I hate transferring all the marking necessary for pleats and there are quite a few on this skirt. Honestly though once I started I was done in no time. I originally wondered why there was a top and bottom skirt piece, it looked to me like that it could have just one front and back piece. I believe I understand why now. The top front and back top skirt piece is interfaced and that makes the skirt really stand out. If you cut one piece the fullness of the pleats would be lost. The skirt sewed up in less time than it took me to transfer all the skirt markings.

Since my lining was already finished it was all a breezed from here. I just sandwiched the bodice between the skirt and the skirt lining, understitched the skirt and hemmed. ALL DONE!

Despite my issue with the back band, I love this dress. This linen is absolutely amazing! I love the bright color, the texture, the hand, the weight...everything. Make sure you grab some, it's perfect for summer dresses, tunics, wide legged pants and more!
~ Tiffany
|
Posted on April 22 2017
Tiffany, this is beautiful! You look amazing in this and thank you for all the details on fitting this!
Thank you Sue!
Beautiful dress and how rare to see linen in this brilliant colour red. I have similar experiences with patterns…expecting to run into trouble and then amazed that it comes together without a hitch.
Beautiful outfit and color. Not to tight across the back and if you feel as though it is just open up a tad. Otherwise great fit.
Thank you Sue! I don't always remember to take pictures the process but I'm glad I did this time.
Wow! What a showstopping dress. You did a great job, and I bet you will wear this a lot!
Thank you. This red was even more gorgeous in real life than it appeared online. Don't you love it when things come together?!
Thank you! I certainly plan on it!
Thank you. The more I look at it the less it bothers me.